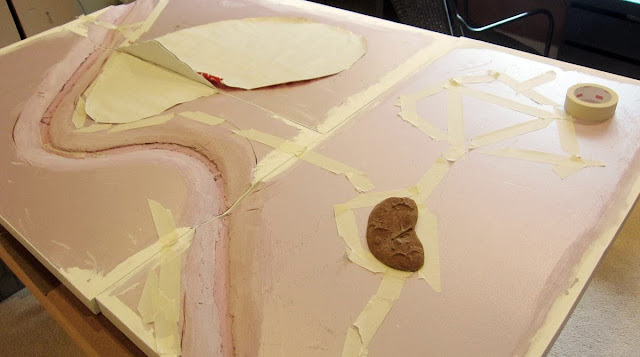
I spent some more time on my terrain boards, adding hills and mapping out some roads. It took some time to get everything juuuuuust right. See my progress after the jump.
This is the fourth stage of my terrain board build. Check out the earlier steps if you've missed them:
- Terrain Boards Part 1: Planning
- Terrain Boards Part 2: Base and Edges
- Terrain Boards Part 3: Cutting the River
Planning
I mapped out the roads with masking tape. I tried a number of different variations that would work regardless of how I assembled the terrain boards. Still, there were a few configurations that weren't perfect, but I came to a compromise that I was satisfied with.Getting the Geology Right
I tried a number of layouts for the hills. While certainly game-worthy (with lots of levels and line-of-sight blocks) they but all looked unrealistic to my eye.I went back to my reference photos and studied the geography of the northern European landscapes I'm hoping to emulate.
To match the folded and undulating terrain, I layered several pieces of foam on each other, shaping them with my hot wire cutter and sand paper.
The resulting hill was larger than I had initially planned, but I was happier with the more organic and natural feel to it.
For terrain that would have been lifted and exposed by plate tectonics I hotglued bark mulch to the non-sloped areas.
I doubled checked that any sloped area could support figures without them falling over.
Smoothing The Hill
Satisfied with the arrangement and slope of the foam I used calk to fill in various gaps between the pieces...and gave it a liberal application of spackle to smooth the entire hill out.
There's quite a bit of trial and error with this project, but I'm learning a lot and looking forward to the finished piece. Next up, texturing the entire board.


Looking great, you'll need to keep an eye on the slopes as I have learnt to my cost that when you scatter grass etc on top the friction is greatly reduced depending what sort of figure bases you have ?
ReplyDeleteUh oh. Thanks for the tip, I'll keep an eye on it. These hills might wind up being stripped mined in the future if they prove too slippery!
DeleteAbsolutely splendid, looking really impressive.
ReplyDeleteBrilliant! Look forward to seeing the finished boards!
ReplyDeleteFantastic progress - the hills look really nice
ReplyDeleteI've never tried bark mulch for rocks but they look great
Looking forward to seeing more
Thanks Miles! I've used the bark in some small terrain projects before, hoping it works out en masse.
DeleteLooking great, your project is really coming along! Other than the big mess and finding a space to work, I love doing terrain. Creating the world is one of the best parts of the hobby. :)
ReplyDeleteGreat tutorial. I'll definitely use many of your ideas.
ReplyDeleteGreat series! Very helpful and your progress looks beautiful. I recently tried out your bark mulch tip on a small hill that I scratch built (my first ever scratch built terrain). I love the tip. You can see my hill on my blog. Thanks for the inspiration. http://ajburgoyne05.blogspot.com/
ReplyDeleteGlad I could help!
Delete